Follow me on:
Gluten-Free French Baguette – No Eggs, Dairy, or Gluten
Last summer, when my friends came over, I made gluten-free bread for them. At first, they were hesitant to try it. Many of them were skeptical about gluten-free bread, expecting it to be dry or flavorless. But after one bite, their opinions changed. Now, they can’t stop eating it! They’ve started making this bread twice a week, and it’s become a regular part of their meals. In fact, they no longer eat any other bread but this one.
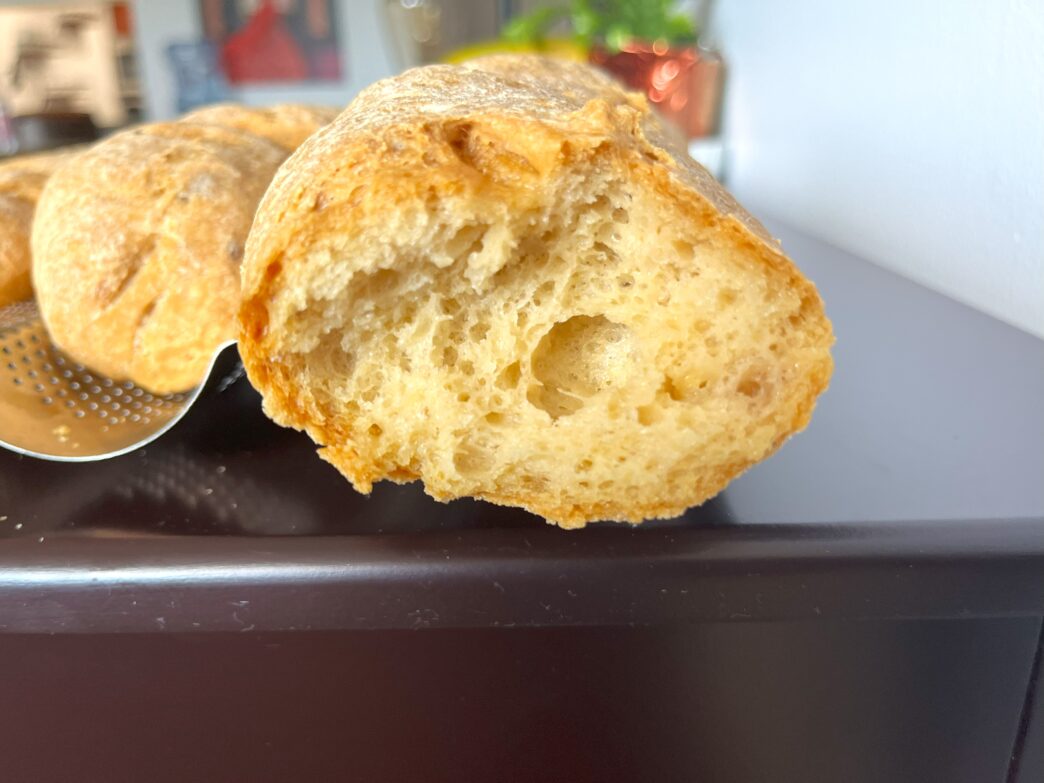
If you’ve ever been reluctant to try gluten-free bread, I understand. Gluten-free breads often fall short in taste and texture. But this Gluten-Free French baguette is different. It’s soft on the inside with a perfectly crisp crust – just like the traditional baguettes you’d find in any French bakery. Made without gluten, eggs, or dairy, it’s a healthier alternative that doesn’t compromise on flavor or texture. Whether you follow a gluten-free, AIP, paleo, or vegan diet, this baguette will soon become your new favorite.
Why You’ll Love This Gluten-Free French Baguette
This recipe is not only gluten-free, but it’s also dairy-free and egg-free. It’s a great option for anyone with dietary restrictions. I’ve spent a lot of time perfecting this bread to ensure it has the best texture and flavor.
I adapted the baking method of this gluten-free French baguette from traditional wheat bread baking techniques to ensure the perfect texture and flavor. The bread has a soft, airy inside with a crunchy crust, just like the traditional French baguettes.
Want updates when I publish new blogs or recipes?
Step-by-Step Instructions
Activate the Yeast
Start by activating the yeast. In a small bowl, combine 10g of yeast with 1 teaspoon of honey (or maple syrup) and 1/2 to 1 cup of warm water (about 38-40°C). Stir the mixture gently and let it sit for 10 minutes. The yeast should begin to bubble and foam, which means it’s activated and ready to work its magic in the dough.
Prepare the Wet Ingredients
While the yeast is activating, mix the remaining wet ingredients in a separate bowl. Combine the rest of warm water, 70 ml of avocado oil, and 3 tablespoons of apple cider vinegar (ACV). Stir everything together well. The oil and vinegar will add moisture and help create the soft texture typical of French baguettes.
Create the Psyllium Husk Gel
In a separate bowl, add 30g of psyllium husk to the wet mixture you just prepared. Using a hand mixer, blend the psyllium husk with the water mixture on high speed for about 30 seconds. This step is crucial as it helps the psyllium husk turn into a gel-like consistency, which not only binds the dough but also adds fiber and improves digestion. It will give your bread a wonderful texture, making it soft and chewy on the inside.
Combine the Dry Ingredients
In another large bowl, whisk together the dry ingredients: 360g of tapioca flour, 210g of white rice flour, 210g of chickpea flour, 12g of sea salt, and 1/4 teaspoon of kelp powder. Mixing the dry ingredients well ensures that the flours and seasonings are evenly distributed throughout the dough.
Combine Wet and Dry Ingredients
Now that your wet ingredients (yeast mixture and psyllium husk gel) are ready, pour them into the dry ingredients. Stir everything together with a wooden spoon or spatula until the mixture is fully combined. The dough will be sticky and slightly denser than traditional bread dough, but this is perfectly normal for gluten-free dough. It may seem a bit different, but don’t worry – this will give you the desired texture in the end.
First Rise – Let the Dough Rest
Once your dough is mixed, it’s time to let it rise. Cover the bowl with a damp kitchen towel to keep the dough warm. Let it rest in a warm place for 45 minutes. This first rise allows the yeast to activate and the dough to expand. You’ll notice that the dough will become slightly puffed up and airy.
Shape the Dough and Let It Rise Again
After the first rise divide the dough in 3 equal parts. Then, transfer the dough onto a clean, lightly floured surface. Shape it into your desired baguette shape, making sure to stretch it gently without overworking it. Place the shaped dough onto a baguette baking tray and let it rise for another 45 minutes. This second rise allows the dough to fully develop, resulting in a soft interior with a crispy crust.
Preheat the Oven and Prepare for Baking
While the dough is rising for the second time, preheat your oven to 500°F (260°C). During this time, place a glass dish of water in the lower part of the oven. The steam from the water will help create the perfect environment for the bread to rise during baking, resulting in a crusty exterior and soft interior. The steam mimics the traditional bread-baking process, which is essential when making gluten-free bread.
Bake the Baguette – Initial High Heat
Once the dough has finished its second rise, carefully transfer it to the preheated oven. Be sure not to open the oven door while the bread is baking. Bake at 500°F (260°C) for 30 minutes. During this time, the bread will bake at a high temperature, allowing it to develop a golden brown crust while maintaining its soft inside. The steam from the water will help create the signature crispy exterior you’re looking for.
Lower the Temperature for Even Cooking
After 30 minutes, carefully remove the glass dish of water from the oven. Lower the temperature to 365°F (185°C) and continue baking the bread for an additional 30 minutes. This second phase of baking at a lower temperature ensures that the inside of the bread is fully cooked and fluffy, while the outside remains crisp and golden.
Cool and Slice
Once your baguette is done baking, remove it from the oven and place it on a wire rack to cool. Allow it to cool completely before slicing into it. This step is important because it helps the bread set and prevents it from becoming too moist inside. The longer you let it cool, the easier it will be to slice. Once cooled, slice and enjoy your freshly baked, gluten-free French baguette!
This recipe is perfect for anyone looking for a healthier bread option without gluten, dairy, or eggs. My friends and I can’t stop making this baguette – it’s become a staple in our kitchens. Whether you’re following a specific diet or just looking to try something new, this gluten-free French baguette is sure to become your new favorite bread.
Let me know how it turns out and if you make any delicious variations!
You might also like these recipes:
Crispy AIP Crackers You’ll Love
If you’ve made this recipe, I’d love to hear how it turned out for you and if you love it as much as my friends and I do. It’s quickly become a staple in our kitchen, and I’m sure it will be one in yours too! Leave your comments below and let me know about any variations you’ve tried or tips you’d like to share. Your feedback means so much, and I can’t wait to hear all about your experience with this delicious gluten-free French baguette!
Want updates when I publish new blogs or recipes?
Gluten-Free French Baguette
Recipe by AIP Wellness JourneyCourse: Side Dish, Main Course, Lunch, DinnerCuisine: FrenchDifficulty: Medium12
servings30
minutes1
hour294
kcal1/4
baguette90
minutesA delicious gluten-free French baguette made with tapioca flour, rice flour, and chickpea flour, combined with psyllium husk for a perfect texture and avocado oil for richness. This easy-to-make recipe yields a soft, flavorful, and dairy-free, egg-free, and wheat-free bread with a crisp crust. Ideal for those on a gluten-free diet or anyone looking for a healthier bread alternative. Perfect as a side or for making sandwiches!
Ingredients
360g tapioca flour (2 3/4 cups or 0.8 lbs)
210g white rice flour (1 3/4 cups or 0.46 lbs)
210g chickpea flour (1 1/2 cups or 0.46 lbs)
10g yeast (2 1/4 teaspoons)
1 tsp honey or maple syrup (5g or 0.18 oz)
1/4 tsp kelp powder (0.5g)
30g psyllium husk (3 tablespoons or 1 oz)
70ml avocado oil (1/3 cup or 2.5 oz)
3 tbsp apple cider vinegar (45g or 1.5 oz)
Directions
- Mix the yeast with honey (or maple syrup) and warm water. Let it sit for 10 minutes until it’s frothy.
- In a separate bowl, combine the remaining water, avocado oil, and apple cider vinegar.
- Use a hand mixer to quickly mix the psyllium husk with the wet mixture. This step creates a gel-like texture that helps bind the dough.
- Whisk the tapioca flour, rice flour, chickpea flour, sea salt, and kelp powder together.
- Add the yeast mixture and psyllium husk mixture to the dry ingredients. Stir until well combined.
- Once the dough is mixed, cover it with a damp kitchen towel. Let it rest in a warm place for 45 minutes.
- After the first rise, divide the dough in 3 equal parts and shape it into your desired baguette shape. Place it on the baguette baking tray and let it rise for another 45 minutes.
- Preheat your oven to 500°F (260°C) during the second rise. Place a glass dish of water in the bottom of the oven to create steam.
- Once the dough has risen for the second time, carefully place it in the oven. Bake at 500°F (260°C) for 30 minutes, making sure not to open the oven door during this time.
- After 30 minutes, remove the glass dish with water and lower the temperature to 365°F (185°C). Bake for another 30 minutes to achieve that perfect golden-brown crust.
- Once baked, remove the baguette from the oven and place it on a wire rack to cool.
Recipe Video
Notes
- Psyllium husk: It's important to mix the psyllium husk thoroughly with the water mixture, as it helps create a gel-like texture that improves the dough's consistency. It also aids in digestion.
- Yeast: Ensure the yeast is activated by mixing it with warm water and honey/maple syrup. Let it sit for 10 minutes until bubbly before adding it to the rest of the ingredients.
- Flour substitutions: If you're unable to find chickpea flour or rice flour, you can experiment with other gluten-free flours, such as millet or sorghum.
- Resting times: Make sure to allow the dough to rest for both the first and second rises. This helps the dough develop its structure and texture, ensuring the bread rises properly.
- Baking temperature: The high initial temperature (500°F) helps form a nice crust. Do not open the oven during the first 30 minutes to maintain the heat. After that, lowering the temperature to 365°F ensures thorough baking without burning the crust.
- Storage: This gluten-free bread is best enjoyed fresh but can be stored in an airtight container for up to 3 days. You can also freeze slices for up to a month.
- Serving suggestions: This bread pairs well with soups, salads, and spreads. You can also use it for sandwiches or as a side for any meal.


